How to Use a Protractor?
reviewed by Jo-ann Caballes
Updated on May 31, 2024
By the 4th grade, kids begin learning types of angles. Soon, they advance to determining angles with a protractor.
But many children think this instrument is just a confusing semicircle with dashes and numbers. That’s a huge mistake! Kids MUST learn to measure angles with a protractor. Here’s how you can help them to make friends with this confusing tool.
How to read a protractor?
Using a protractor involves three easy steps:
- Align the angle’s vertex with the dot at the protractor’s center.
- Place one side of the angle along the 0-degree line on the protractor.
- Check where the other side of the angle intersects the number scale for measuring angles with a protractor.
The flow may seem simple. However, protractors sometimes challenge even high schoolers. If this is the case with your kid (no matter their age), you may want to seek specialized help.
These days, you can access multiple online platforms like Brighterly to find the best tutor for your child.

It’s easy to start: go through a straightforward sign-up form, and the platform will match you with the most suitable professional. The benefits are many:
- 1:1 tutoring;
- intensified work on the weakest areas;
- learning to understand instead of memorizing.
Address soon, and you will see how your child efficiently manages the protractor and excels during math classes!
Understanding Protractor Parts
To read angles on a protractor correctly and avoid any future inconsistencies, your kid should understand all the basic parts of the tool.

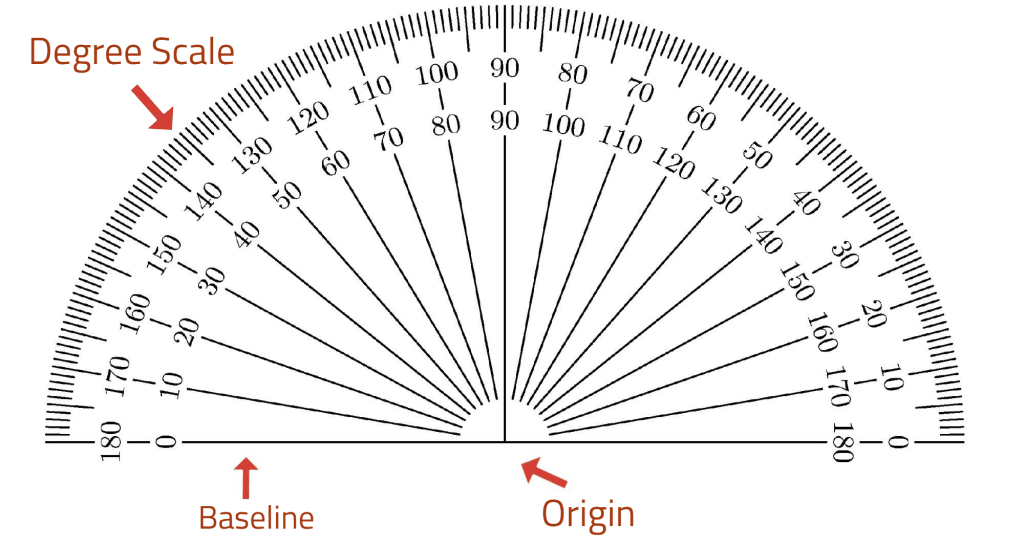
Baseline
The baseline of a protractor is a horizontal line at the bottom, also referred to as the reference point. A vertical line bisects the baseline of a protractor at its center point. Since the baseline has two sides, they are called left and right-side baselines.
Origin
The origin of a protractor is a point where the baseline and the perpendicular line meet at the bottom. A vertical line cuts the baseline precisely in the middle — through the origin. This place is also called the center or midpoint.
Degree Scale
When your child first handles a protractor, they may notice long and short lines.
- Each short line inside a semicircle represents a degree, and the total number of degrees is one hundred and eighty(180). There are tiny line segments for every one degree (1), with extra line segments for every five (5) and ten degrees (10) in between.
- An inner degree scale shows the numbers from 0 to 180 rotating anticlockwise from the right side of the protractor. The outer degree scale shows the numbers rotating clockwise from the left side of the semicircular degree scale.
How to use a protractor to measure angles
To learn how to measure angles using a protractor, your child should align the origin with the angle’s vertex, line up the angle’s side with 0 degrees on the protractor, and interpret where the other side of the angle crosses the degree scale.
However, note that the scale has two sides. Kids should be careful with that and learn to use the same number scale for both sides of the angle.
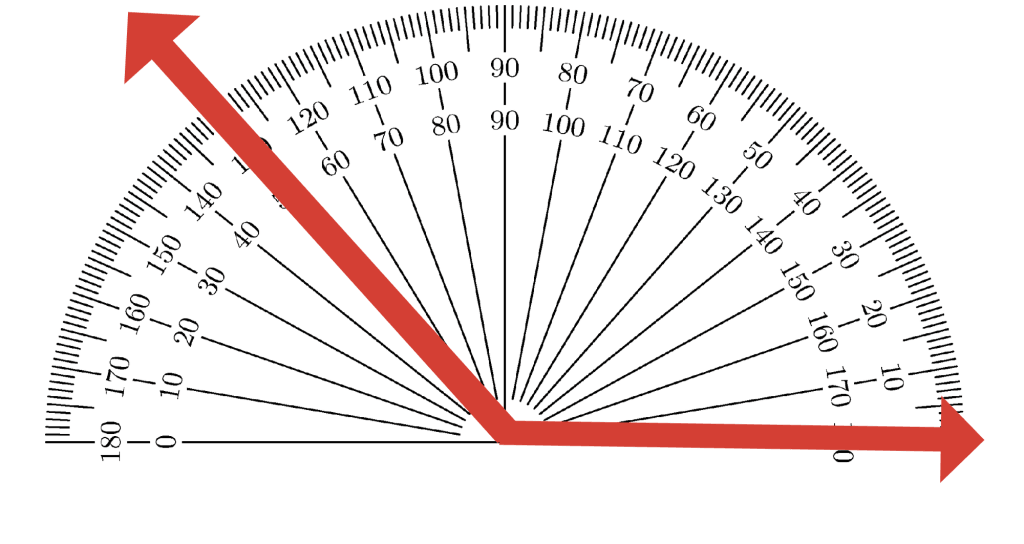
How do you read a protractor? Let’s practice!

In the example above, one side of an angle crosses the 0-degree point at the inner scale. Thus, your kid should also read the inner scale to define the angle.
And here’s to the essence: how to find the measure of an angle? The angle’s side crosses the scale at 130 degrees, which is actually the measurement we needed.
Teaching how to use a protractor for kids
Using a protractor for kids involves several steps:
- First, explain to your child what those numbers mean and remind them to read the correct scale (inner/outer);
- Help the kid to find the origin and place it at the vertex of the angle you’re about to measure;
- Tell them to align one angle’s leg with the baseline.
- Then, follow the opposite angle’s leg up to the measuring scale. Double-check that your kid refers to the correct scale.
- To practice, the child can also use the protractor to determine each angle of a given triangle.
Once a child learns to measure angles, they face another challenge — the need to interpret the results. It is just a little reminder that there are three common types of angles:
- Acute angles — those that are less than 90 degrees;
- Obtuse angles — if they are above 90 degrees;
- Right angles — that are precisely 90 degrees.
Here’s a little practice:
All in all, protractors are indispensable for any math learner who wants to master the subject. But is it the only way to measure angles?
Not really! You do not need to panic if you don’t have a protractor at home. Here are a few life hacks for replacing the instrument with improvised means.
Print a Protractor
You can use a protractor for kids in its printable version. Just download the protractor in PDF format. This improvised tool is handy because you can make it in many copies. So, if your child damages anything, you can get a new one for them.
However, note that experts don’t recommend using this alternative regularly. The thing is that the measurements may be off. Sometimes, you may end up with degree scales that are either less or more than those on a standard protractor.
Using A Clock Face
If you are wondering how to find the measure of an angle with a clock, it’s easier than you might think. First, help your kid picture the angle, like the clock hands moving from twelve to six o’clock. That’s how it works: every hour marked on the clock represents 30 degrees.
Likewise, if the clock hands show 3 and 6, then there are three marks on the clock face, making a 90-degree angle (3 hours multiplied by 30 degrees). This technique helps estimate angles that match the well-known segments of a clock.
Paper Folding
For this method, your kid just needs a piece of paper. First, help them fold the paper along one side of the angle to align the edge with the other side. After folding, examine the angle formed by the crease.
This technique is excellent for defining right angles. But it’s also limited to this angle type only.
Compass And Ruler
It is the most complex and accurate method. Your child needs a compass and a ruler.
- First, ask them to draw a line or a part of the angle with the ruler;
- Tell them to place the compass on one endpoint of the line and draw an arc. Then, move the compass to the other endpoint and draw another arc;
- The intersection of these two arcs will be the vertex of the angle;
- Help them use the ruler to measure the angle between the two rays.
This method uses the principles of circles and radii to measure angles accurately.
Conclusion
A protractor is the math instrument children tame during their early school years. But they also use it extensively in the middle and high school. That’s why learning to work with it correctly is so important. In fact, with a bit of extra clarification and guidance, measuring angles with a protractor is not that difficult.
So, if you need help with the tool or any other math topic, why not address experienced tutors at Brighterly? Caring and professional, they will help your kid understand what they study, not just blindly memorize.


